Hi Nancy here,
My Amish Abstractions book came today and I think it is wonderful so glad I decided to buy it.
Now to pick a quilt and get started.
All the quilts this group has done are fantastic. Hope I can meet the challenge.
Tuesday, March 30, 2010
Back nearly done
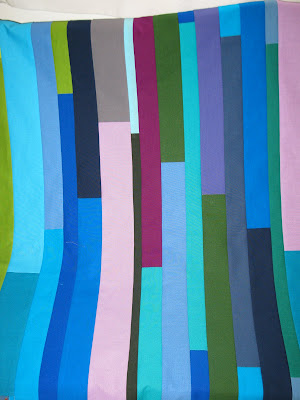
This is the pieced backing for my quilt (here)
(DH isn't very good at holding up quilts. He gets arm ache!)
There was a lot of huffing and puffing about the layout and what colour to use as the background, but DH had a rummage through the solids bin and came up with this. He then swapped strings and stripes round (yes Tonya - he did!) et voila!

It needs to be about 4/5 inches bigger all the way round and then I'm ready to baste and hand quilt - woo hoo!
Amish Pyramids

Have been beavering away to finish the Pyramids, needed some more Orange so a quick trip to Ikea was on the menu. Managed to finish the machine quilting the day before last, thankfully I didnt run out of sewing thread - this free motion quilting surely eats it up. All I have to do it put on the binding - then I have to introduce my words - have an idea just hope it works. Have enjoyed the challenge with this Tonya.
Irene V.
Monday, March 29, 2010
finished top
Hi, Heidi here,
the top is finished and I'm quite happy with it. It's grown bigger than I planned, but that's the problem with liberated triangles. They try to escape :-))
The two colours I showed in my previous post were the only alternatives, they were the only ones in my stash of which I had enough.
The colours in the phote aren't very good, the blue is much more richer and the light reds do sparkle ( as you some of you predicted ).
It will be basted and quilted later this year, but I already see some quilted triangles in the blue background :-)
Tonya, thank you so much for setting up this challenge and thank you all for the help with the colour.
Befreite Dreiecke ( liberated triangles ) 44x37"
Oh, and probably I'll shorten it a bit

Heidi
Sunday, March 28, 2010
Ready for letters

Saturday, March 27, 2010
Liberated String Quilt

(Pattern by Gwen Marston from Liberated String Quilts; color inspiration from Cherri House's City Park Quilt)
I absolutely adore it!
Joan :)
Friday, March 26, 2010
Decisions


Hi from Heidi :-)
Erin is not the only one, who's late.
I've started with some triangles and hope to finish the center the next few days. It will be a small quilt...Now, what colour to use for the border ?
Red or blue ? At the moment I think it's red, but this can change tomorrow :-)
I will let the triangles wander into the border fabric like above, no straight lines and the words probably will be 'befreite Dreiecke' or 'Dreiecke mit vier Ecken' which means 'liberated triangles' or 'triangles with four corners'.
So, can you help me with the border colour ?
Thanks Heidi
Thursday, March 25, 2010
Getting a late start
Hi, Erin here. When I last posted, I was getting ready to order my fabrics while I was house sitting; but I didn't have an internet connection so I never did order my fabrics. It's just as well because I changed my mind on my inspirational quilt. I was thinking of using #070 as my inspiration, but while I was looking at some quilt photos in my inspiration file, I noticed that #070 looked too much like a Kaffe Fassett quilt that I like. I decided on #094 for my inspiration instead.
It took me a while to narrow down my color choices. I kept wanting to add in more and more colors. I'm using the Krystal line from Michael Miller Fabrics. I finally decided to add only those fabrics named for fruits to my shopping cart and see what I ended up with.

I thought it looked like a pleasing combo. So I have fun color names like mango, pomegranate, papaya, blueberry, raspberry, and citron. That influenced my word choices. I'm going to call my quilt "Tutti Frutti." Unfortunately I'm house sitting [again] and my camera battery is dead so I can't show you any more than that right now.
Wednesday, March 24, 2010
Quilt Top Finished

My liberated Amish quilt became a Chinese Coins design, even though I meant it to be a liberated version of Bricks in Bars in the Brown Collection. I had decided to put my initials or words on the back of the quilt, because I wasn't pleased with my initials on the front. Today when I was cutting the outer borders, I cut one too short, with not enough fabric remaining to recut.
This could have led to interesting and colorful liberated solutions, but the strip with my initials was sitting nearby. It was just the right length, so I stitched it onto the border. The quilt top is 30" x 32". I may try freehand Baptist fans on this quilt; I am practicing them on a square of fabric with borders attached. Thanks to Tonya and Clare for tips on doing freehand fans.
Kathleen C.
Tuesday, March 23, 2010
How I did it
Thanks so much for your comments on my quilt--the one with "perfect" written on it in free-pieced letters. I thought that I ought to post an answer to the questions in your comments. First, Kim wanted to know what was my inspiration--and the answer is more than one of the quilts in the "Amish Abstractions" book, such as the Bricks in Bars, Roman Stripes, Chinese coins, and Joseph's Coat.
Secondly, I was asked my method of assembling the various blocks. I don't have a design wall. I set the blocks out on my bed, and arranged them. I figured out that I needed to make a couple more blocks to balance the quilt. Then I took a photo or two. I used the camera to refer to as I sewed the blocks together. First I assembled the letters, then I made the square-in-a-square block and after that, it was fairly easy to figure out where everything went. Then I added the borders.
Secondly, I was asked my method of assembling the various blocks. I don't have a design wall. I set the blocks out on my bed, and arranged them. I figured out that I needed to make a couple more blocks to balance the quilt. Then I took a photo or two. I used the camera to refer to as I sewed the blocks together. First I assembled the letters, then I made the square-in-a-square block and after that, it was fairly easy to figure out where everything went. Then I added the borders.
Starting over

...with the borders. We had good weather this weekend, so while the kids were outside playing I took advantage of the good light and sat outside and ripped and ripped and ripped. I am now back to this, but of course with the blocks sewn together. So now I'm seeking advice. I think the words will be on the back of the quilt, or the very outermost border, depending on size constraints. So, I'm leaning towards a narrow inner border and then a wide outer border. Thoughts?
Monday, March 22, 2010
I haven't chosen my official project yet for this group/challenge yet, but I decided to play around with some ideas from Gwen Marston's Liberated String Quilts, and I thought the group might enjoy seeing some of the fun.


Unfortunately, after making gorgeous pieces of fabric with liberated strips, I cut them into 5" blocks.

I say "unfortunately" because I really loved the look of those strips all sewn together. We'll see....
Ocean Waves

Pin Basted

Sunday, March 21, 2010
Gwen Marston blog posts
Just a quick note to say my blog posts from the Gwen Marston classes are all up on my blog:
Saturday, March 20, 2010
Inspired by Rene'

I wonder if I can capture the sparkle of it?
Friday, March 19, 2010
"True Love"

We are now on Flickr
Clare here.
I've created a group on Flickr. Click on this link to get to the group page. If you are not on Flickr yet, or don't know how it works, just shout.
I'm also working on adding another album to the Liberated Quilters group on Facebook. If you are on FB and haven't yet joined the Liberated Quilters group, the link is here. If you are not registered on Facebook you will not be able to access the group.
Thursday, March 18, 2010
Houses?
Not sure my border is going to stick with these quilt blocks. Not even sure how many quilts I'm going to end up with, not to mention orphans.

I made a wonky house block to show someone how to make them. (that first one is middle bottom in this next photo). Thought the block was incredibly dull, and was then amazed how much I liked it with the components I was working on. So I made a couple more houses, this time incorporating some of the strippy bits I'd already made

I took my blocks home and when I put them on my design wall, I was no longer sure I should include the X blocks. I'm not always sure where the line is between fun busy and too busy.

Taking out almost all the X blocks and the triangles:

I have a few more houses to finish up. And I want more components that have wider strips, bigger pieces. Then I'll play some more.
What do you guys think?
It's a Flimsy!
 Waste Not Want Not is now a flimsy!! (48" x 68")
I wish the photo did a better job of showing the deep, wonderful purple of the 6" outer border ~ maybe once I take it outside in the sunshine the true colors will photograph. Unlike my first LAGT project (No Words Needed), this one has words on the front. (photo will enlarge)
 Okay, I confess, I did use fusible and machine applique instead of free-piecing (I've been home with a horrible cold/ear infection & my brain just couldn't handle free-pieced letters).
I'm pretty sure Waste Not Want Not will end up with Baptist Fan quilting (I'd love to do freehand fans, but my wrist/thumb will not tolerate that kind of handwork) and the binding will be red. Woo Hoo!
There is another liberated log cabin quilt in the works, but it will not be done by June. Once No Words Needed and Waste Not Want Not come back quilted from Chris and I get the bindings done, I'll share "finished" photos.
Wouldn't it be awesome to have all the amazing quilts from this challenge in one place ~ that would be visually incredible! There are so many amazing quilters participating in this challenge . . .
Quiltdivajulie
Wednesday, March 17, 2010
Roz's liberated Amish quilt

finished top

After having added to my stash of Cherrywood fabrics, and received a nice donation from Librarygal Pam, I was finally ready to make some letters and words. I used 1.5" and 1" strings for the letters - so they are quite big!
Some of you will know that Quilt it is the name of my blog - could not resist integrating that phrase. Reading the book, I noticed how "making do" was a central value of the Amish. So these two phrases kind of stuck in my head, and I love how they sound together. I was planning on using them in the opposite order - make do, quilt it. But then I made a little mistake in choosing the colors for the letters (yellow letters on purple background) so I had to switch the two around. Or to make do - you could say....

It's a bit hard to get a true picture of the dark purple colors - still winter...
I am considering hand quilting this in big baptist fans or machine quilt a diagonal grid. Not sure yet, but my hands are saying they need a rest from hand quilting...
Loved making the letters, have started planning another all letters quilt. And there is so many pretty Amish quilts to be inspired by....
Tuesday, March 16, 2010
My second!!
Hi!! Anne, Oslo, Norway here!! At last, my second top is ready for quilting!! I think I`m going to machinequilt it myself. I have had a lot of fun with this one too!! I realy enjoy this way to saw.....Not need to think 1/8 inch measurement. And to play with the colors.... Love it!!


Monday, March 15, 2010
The Project
This is Wendy. My DH has termed this "The Project", so the name has stuck. Here's my crystal blocks I've been L&E for the past few weeks. My quandry (much to my DH's amusement) has been which background to use. In case you can't see the colors well, we have dark green, black, burgandy and navy. The burgandy is about a half step darker in real life. That's the one I'm leaning toward, but the black is nice, too. So is the navy. Of course I just like the color green. See my problem? I need impartial judges, please.


Wendy
ZigZag
 Knit One Quilt Too Kristin here. I decided to finish these blocks while at my class with Gwen Marston. I will let you know when I get that blog post up! However, I didn't know what setting to use. The one above was the first one I tried- it would be big and would need those setting triangles.
 The second one I tried was the one above. I kind of like the asymmetrical setting now as I look at it, but at the time I thought I'd need to make 4 more blocks and I didn't want to do that.
So, this is what I ended up with (like #94). I love it! The gals in the class liked it so when it came time for show & tell I told everyone about the challenge. Tonya's info got bandied about and everyone's excited to see her book come out. I showed several of my word quilts. I still hadn't come up with a word, but one of my classmates suggested ZigZag and that's what I'm going to use! I would love to do a red & black border similar to the original, but I have no more of this black. I'm still trying to figure out which brand it is. I think it might be the Moda solid black. Anyway, that's where I am!
Saturday, March 13, 2010
Maybe Not
Just more playing. When I first looked at the Ocean Waves quilt, one thing I noticed was how the blocks formed X's and O's. I decided to play with that aspect of the quilt by making my kind of X's and O's. Learned one thing for sure - these do NOT go all together like this. Will most definitely need plain border separation.

I like the X's though. I had fun making them a bit more scrappy than usual.
How are you all doing? Been seeing some FABULOUS quilts. If anyone is still stuck trying to decide what quilt to do or what colors, please post about it, maybe we can all help.
take care, ton
Be well craziness

I've finished the crazy patch border on this (with lots of red) and I'm really liking it. (For some reason, the words are fuzzy here. sorry). It's measuring about 46 inches square and I'm planning to make it into a rectangle with a top and bottom border, and then putting blue borders all around. Here it is again with blue fabric--the only yardage purchased for this project, lying on the couch underneath the design wall. I'm toying with the idea of another dark narrow border to stop the crazy patches, then red top and bottom, and then the royal.

Finally some progress...
I don't have any good excuses... just been really busy lately. Here are my first two blocks. The A and the P are the first letters from an Amish proverb that I love. "A plump wife and a big barn never did any man harm". I figured if I wanted to keep this quilt I better just use the first letters (besides I didn't think I could do 39 letters) otherwise my husband would get embarrassed everytime anyone saw it...


I am pretty happy with my first letters ever. It will be fun to include them in the churcn dashes... then I won't have to figure out where to put them later :)
my progress

Thursday, March 11, 2010
beautiful threads
http://www.pumpkinpatchprimitives.com/catalog.php?category=129
Hi Beth,
Just wanted to share this site for thread ideas.......
Brenda is the owner of pumpkin patch primitives and leader of another
challenge group I belong to.
Your baskets are lovely.
Happy Sewing
Hi Beth,
Just wanted to share this site for thread ideas.......
Brenda is the owner of pumpkin patch primitives and leader of another
challenge group I belong to.
Your baskets are lovely.
Happy Sewing
ready.
 I'm ready to quilt this!
Yeah!
My plan is big stitches with dark thread.
Maybe black. Maybe various colors.
Floss?
Quilting thread?
How about DMC floss on those little rolls?
Should I buy size 12 floss?
And where do I get it?
The shops around here have only size 8 which is kind of thick.

I even splurged and bought wool batting!!
Any hints about thread would be appreciated.
:)
Stitching the piglet

Hello everyone, Lynley here in Canberra, Australia. I've started handquilting on my little pink pig, although I don't know if I'll be finishing it any time soon! It's nothing complicated - just outline quilting in the pinwheels in a starburst style with navy thread. The pink and green blocks are getting freehand baptist fans. And I'm using a nice bright pink thread as someone suggested.

No idea about the border yet; we can wait and see how it progresses. At this stage I'm thinking something complicated and completely unrelated to the piecing of the border - like a cable, or feathers .... but I suspect I'll be getting sick of it all by that stage and it'll end up being straight lines. Not that there's anything wrong with that.
Wednesday, March 10, 2010
Monday, March 8, 2010
Half way there

Have my Chinese coins set in their strips. NOw on to the borders. Waffling about letters. Not sure I want to do that, but have another idea in mind. We shall see.
The Back Is Done!
 The back is done! The center medallion (name panel) measures approximately 30" x 40" ~ and, because I had nothing on hand with enough continuous yardage, I created a pieced back fabrics that appear in the front of the quilt. [both photos will enlarge when double-clicked]
 I admit to being heavily influenced by our years spent living in Indiana Amish country ~ my quilt is much more Midwestern than Lancaster-ish (summertime meant blue skies, golden sunshine, and colorful flowers).
 Of course, the top is still on the design wall, not at all stitched together. But, the binding strips are cut and the back is done! Woo Hoo!!!!
 Of course, the top is still on the design wall, not at all stitched together. But, the binding strips are cut and the back is done! Woo Hoo!!!!
To see how I used the other leftovers, please visit my blog to check out Waste Not, Want Not.
Saturday, March 6, 2010
broken dishes

More Amish craziness


What do you think? I'm thinking it needs to either go inside the navy border, or on top and bottom of the crazy patches. I want to get this to throw size (about 50 by 60, so I will need another border after the crazy patches.

Thursday, March 4, 2010
Center Square

Brenda here with another go at this challenge. I decided to combine my two previous starts (the words and the strip piecing) in a liberated version of #31, Center Square. The center square is framed with bigger and bigger strips in different values. I've done that, and then framed the wide borders with a narrow one to provide a break between the crazy piecing and the calm center borders, which lead to the words "Be Well." Sort of Amish Zen, if that makes any sense. Right now it's 36 inches square, and after the crazy border I'm going to put wide borders top and bottom to turn it into a rectangle like on the original, then another border to get it to throw size. In the inspiration quilt, the quilting motifs brings the quilt to life, so stay tuned for that.
Amish?
Well I have finally decided on "Broken Dishes" plate 25, page 74.
It has more sparkle than what I have tried to do
here. This just looks dark and dull to me and has no zing. I'm moving on!
 Try, try again.
It has more sparkle than what I have tried to do
here. This just looks dark and dull to me and has no zing. I'm moving on!

Subscribe to:
Posts (Atom)

